| Basic Audio is a free introductory textbook to the basics of audio physics and electronics. See the editorial for more information.... |
|
Home  Electronic Amplification Demonstration and Calculation of Gain Electronic Amplification Demonstration and Calculation of Gain |
||
| See also: Decibel Calculations, Dynamic Gain Measurements | ||


|
  |
|
|
Demonstration and Calculation of GainAuthor: N.H. Crowhurst
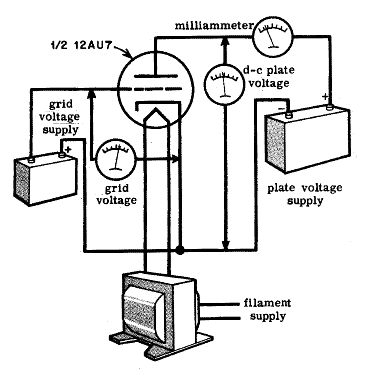
Let us take some figures for a real tube, the 12AU7, which is a general-purpose miniature twin triode with two sets of elements in one envelope. Since both sets have the same characteristics, we need consider only one of them. Using a 250-volt plate supply and a bias of - 8.5 volts, a 1-volt change at the grid produces a 2.2-milliampere change at the plate, from 10.5 milli-amperes at - 8.5 volts to 12.7 milliamperes at - 7.5 volts, or 8.3 milliamperes at - 9.5 volts. Of course, we cannot put the imaginary infinite resistance into the circuit, and we should have considerable trouble finding a source of infinite voltage, but we can get the desired effect by changing the grid voltage and altering the plate voltage enough to keep the plate current constant. (See steps 8 through 13.) Using this method, the current is 10.5 milliamperes with 250 volts on the plate and - 8.5 volts on the grid. Changing to - 7.5 volts on the grid, the plate potential must be dropped to 233 volts to keep the current at 10.5 milliamperes. Changing the grid potential to - 9.5 volts, necessitates raising the plate potential to 267 volts. From the first measurement (steps 1 through 7), the transconductance is found to be 2.2 milliamperes per volt (2200 micromhos). From the second measurement (steps 8 through 13), the amplification factor is found to be 17, because the change in plate potential required for constant plate current with a 1-volt change in grid potential is 17 volts each way. From this we can find the plate resistance (gm must be in amperes per volt, to give Rp in ohms): therefore, ft - gm Rp and Rp = ft/gra = 17/.0022 = 7700 ohms. Now assume that we are using a 355-volt supply and a load resistor of 10,000 ohms, with the bias still at - 8.5 volts. With 10.5 milliamperes of current passing through it, the drop will be 105 volts, still leaving the average voltage at the plate at 250 volts. By calculation, the gain should be
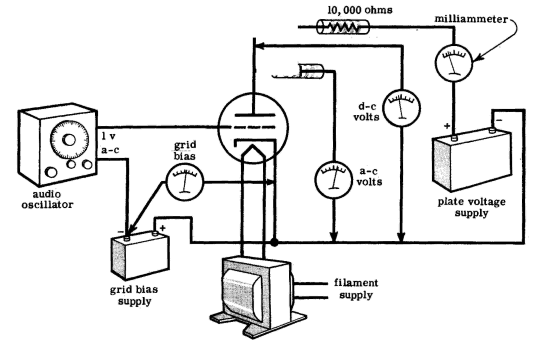
Each volt change on the grid will cause 9.6 volts change at the plate. This checks with the experiment (steps 14 through 17), using a 10,000-ohm resistor and a 335-volt supply. With this tube, a practical amplification of about 10 can be obtained, but regardless of the way in which the tube is connected, the amplification will always be than 17, the amplification factor of the tube. This is the basis for calculating voltage amplification. The tube is regarded as producing an amplification of the input voltage, stated by its amplification factor at the chosen operating point. The actual voltage amplification is then this number, divided between the plate resistance of the tube (at the same operating point) and the plate load or coupling resistance. In the example, the total amplification of 17, theoretically provided by the tube, is divided into 7 (lost in the plate resistance) and 10 (actually delivered across the coupling resistor).
|
||
| Home Electronic Amplification Demonstration and Calculation of Gain |
|
|